部署django+uwsgi+nginx

本地准备工作

  • 从开发机上导出requirements.txt文件,方便在部署的时候安装。使用pip freeze > requirements.txt将当前环境的包导出到requirements.txt文件中。
  • 将本地项目上传到目标服务器上(推荐使用git,可进行版本控制)
    1
    2
    3
    4
    5
    6
    git init  # 初始化。进入本地项目目录,右键'Git Bash Here'后执行
    git remote add origin xxx.git # 添加本地与远程仓库的关联
    git add . # 添加本地文件到缓冲区
    git commit -m 'first commit' # 提交代码待仓库
    git pull origin master --allow-unrelated-histories # 拉取代码,第一次拉取加上参数'--allow-unrelated-histories'
    git push origin master # 推送本地代码

服务器准备工作

  • 服务器上拉取相关代码文件
  • 服务器上安装好python、pip、创建虚拟环境virtualenv以及virutalenvwrapper,使用pip安装。临时更改安装源,以豆瓣源为例:pip install <包名> -i https://pypi.douban.com/simple
1
2
3
4
5
6
7
8
# 编辑当前用户家目录
vim ~/.bashrc 进入文件中,填入以下两行代码:
export WORKON_HOME=$HOME/.virtualenvs
source /usr/local/bin/virtualenvwrapper.sh

source ~/.bashrc # 重新加载配置文件,使之生效。

mkvirtualenv django-env # 创建虚拟环境
  • 安装mysql、缓存数据库等(创建相关数据库create database deploy_demo charsete utf8;
  • 安装requirements.txt相应包
  • 执行python manage.py migrate命令,将迁移文件,映射到数据库中,创建相应的表。
  • setting中设置ALLOW_HOST为你的域名,以及ip地址。ALLOWED_HOSTS = ['key1024.cn','x.x.x.x']
  • 设置DEBUG=False,避免如果你的网站产生错误,而将错误信息暴漏给用户。
  • 执行python manage.py runserver 0.0.0.0:8000,在浏览器中输入http://x.x.x.x:8000/,访问下网站所有页面,确保所有页面都没有错误。
  • 收集静态文件:python manage.py collectstatic
1
2
3
4
5
6
# 在setting.py中设置相关路径,static、static_dist目录提前创建好。 
STATIC_URL = '/static/'
STATIC_ROOT = os.path.join(BASE_DIR,'static_dist')
STATICFILES_DIRS = [
os.path.join(BASE_DIR,'static')
]

安装uwsgi

uwsgi是一个应用服务器,非静态文件的网络请求就必须通过他完成,他也可以充当静态文件服务器,但不是他的强项。uwsgi是使用python编写的,因此通过pip install uwsgi就可以了。(uwsgi必须安装在==系统级别==的python环境中,不要安装到虚拟环境中)。

  • 启动测试
1
进入项目文件下,使用命令`uwsgi --http :8000 --module xfz.wsgi --vritualenv /root/.virtualenvs/django-env`。用`uwsgi`启动项目,如果能够在浏览器中访问到这个页面,说明`uwsgi`可以加载项目了。

配置uwsgi

1
2
3
4
5
6
7
8
9
10
11
12
13
14
15
16
17
18
19
20
21
22
23
# 在项目的路径下面,创建一个文件叫做`demo_uwsgi.ini`的文件,然后填写以下代码:
[uwsgi]
# Django相关的配置
# 必须全部为绝对路径
# 项目的路径
chdir = /srv/your_demo
# Django的wsgi文件
module = demo.wsgi
# Python虚拟环境的路径
home = /root/.virtualenvs/django-env
# 监听端口
http :8000
# 进程相关的设置
# 主进程
master = true
# 最大数量的工作进程
processes = 10
# socket文件路径,绝对路径
socket = /srv/your_demo/xxx.sock
# 设置socket的权限
chmod-socket = 666
# 退出的时候是否清理环境
vacuum = true

然后使用命令uwsgi --ini demo_uwsgi.ini,看下是否还能启动这个项目。

nginx配置

在/etc/nginx/conf.d目录下,新建配置文件xfz.conf,然后复制如下配置文件内容。

1
2
3
4
5
6
7
8
9
10
11
12
13
14
15
16
17
18
19
20
21
22
upstream xfz {
server unix:///srv/your_demo/xxx.sock
}

# 配置nginx服务
server {
listen 80;
server_name x.x.x.x;
charset utf-8;
client_max_body_size 20M;

# 静态文件访问url地址
location /static {
alias /data/xfz/static;
}
# 发送非静态文件请求到django服务器
location / {
uwsgi_pass xfz;
# uwsgi_params文件地址
include /etc/nginx/uwsgi_params;
}
}

配置supervisor

让supervisor管理uwsgi,可以在uwsgi发生异常情况下会自动重启恢复
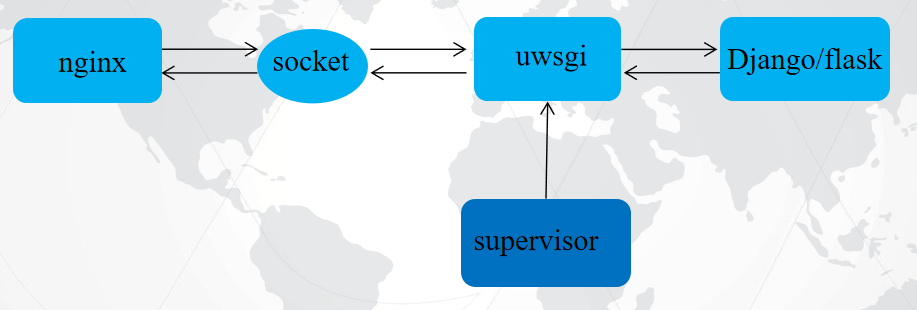
mark

  • 1.’supervisor’的安装:在系统级别的python环境下pip install supervisor,启动supervisord -c xfz_supervisor.conf
  • 2.在项目的根目录下创建一个文件叫做xfz_supervisor.conf,内容如下:
1
2
3
4
5
6
7
8
9
10
11
12
13
14
15
16
17
# supervisor的程序名字
[program:mysite]
# supervisor执行的命令
command = uwsgi --ini xfz_uwsgi.ini
# 项目的目录
directory = /srv/xfz
# 开始的时候等待多少秒
startsecs = 0
# 停止的时候等待多少秒
stopwaitsecs = 0
# 自动开始
autostart = true
# 程序挂了后自动重启
autorestart = true
# 输出的log文件
stdout_logfile = /srv/xfz/log/supervisord.log
stderr_logfile = /srv/xfz/log/supervisord.err
1
2
3
4
5
6
7
8
9
10
11
12
13
14
15
16
17
18
19
20
21
22
23
24
25
26
27
28
29
[supervisord]
# log的级别,一般设置为info或debug
loglevel = info

[inet_http_server]
port = 9001
username = admin
password = xxzx@789

# 使用supervisorctl的配置
[supervisorctl]
# 使用supervisorctl登录的地址和端口号
serverurl = http://127.0.0.1:9001
# 登录supervisorctl的用户名和密码
username = admin
password = xxzx@789

#
[rpcinterface:supervisor]
supervisor.rpcinterface_factory = supervisor.rpcinterface:make_main_rpcinterface

配置完成后,使用supervisord -c xfz_supervisor.conf运行就可以。如果想启动uwsgi就可通过supervisorctl -c xfz_supervisor.conf进入到命令管理控制台,然后可执行相关的命令进行管理:
supervisor> help
* status # 查看状态
* start program_name #启动程序
* restart program_name #重新启动程序
* stop program_name # 关闭程序
* reload # 重新加载配置文件
* quit # 退出控制台
-------------本文结束感谢您的阅读-------------
原创技术分享,感谢您的支持。